Now, that we have created the ACI Access Policies from the previous section, it is time to build the following components:
- Tenant
- VRF
- Bridge Domain
- Application Profile
- End Point Groups
- Contracts
During this step, the student will be learning the advantages of Terraform on how to configure a new ACI fabric in matter of second. We will be leveraging the Terraform ACI resource to deploy the fabric.
If you are not familiar with some of these ACI Concepts, please visit https://aci-lab.ciscolive.com/
Step 1 - Create the directory
The first step is to create a directory for the Tenant terraform files. Using the IDE you can create folders. This directory will live under the ACI folder. There are various ways to create these in visual studio code: using the icons or using the contextual menu ( right click )
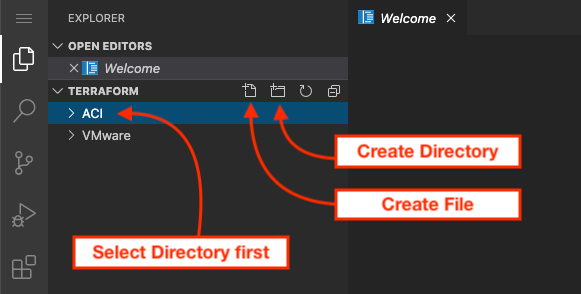
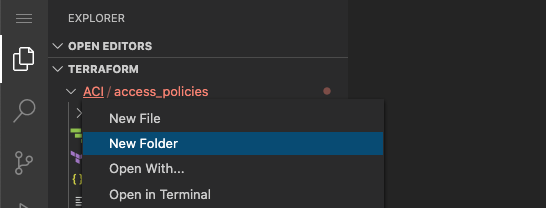
The other option with Visual Studio Code is to right click on the location and a contextual menu will show that you can select to add folders and files.
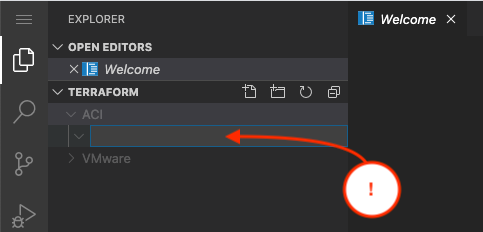
When you click on the directory create ICON then you will be prompted to enter the name of the directory. For this
directory it will be called tenant
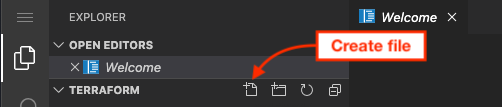
Now in that directory you can create the terraform file. In this case it will be called tenant.tf
Step 2 - Add the ACI provider
As in the access-policies configuration, we need to start with the ACI provider.
provider "aci" {
    username = "admin"
    password = "cisco.123"
    url      = "http://10.0.226.41"
    insecure = true
}
Step 3 - Add the Tenant
In ACI, One of the most important concepts is Tenant. A Tenant is an administrative domain were the fabric user can define policies to be applied to these individual domains ( like companies, departments, projects). Tenants are isolated from each other from a ACI fabric policy but they can share network resources with other tenants such as the common tenant. This policy domain of the tenant makes it possible to give fabric users credentials that only apply in these domains, increasing the security control of the fabric and avoiding costly mistakes.
provider "aci" {
    username = "admin"
    password = "cisco.123"
    url      = "http://10.0.226.41"
    insecure = true
}

resource "aci_tenant" "aci_p30_tenant" {
  name 			= "aci_p30_tenant"
}
Step 4 - Add the VRF
VRF or Virtual Routing Forwarding is the instance which defines the Layer 3 address domain (routing table). In ACI, the user is allowed to configure multiple VRFs in order to increase segmentation in ACI.
provider "aci" {
  username = "admin"
  password = "cisco.123"
  url      = "http://10.0.226.41"
  insecure = true
}

resource "aci_tenant" "aci_p30_tenant" {
  name 			= "aci_p30_tenant"
}

resource "aci_vrf" "aci_p30_vrf" {
  tenant_dn 		= aci_tenant.aci_p30_tenant.id
  name      		= "aci_p30_vrf"
}
Step 5 - Initialize terraform
With the terraform file in place we can initialize terraform for this directory on tenants.
In the terminal window make sure you are in the correct directory and then execute terraform init
cd ~/terraform/ACI/tenant
terraform init
Now run the plan and apply.
terraform plan -out tenant.plan
terraform apply "tenant.plan"
Just like before the output will indicate the changes that it has pushed into the fabric. In the fabric this tenant is now created.
Iterations/Loops
One important part of any automation construct is the ability to iterate over a data set and create many instances of what you are building. In programming lingo we call these iterations and in automation tools like Ansible they have been referred as loops.
These loops give you the ability to modify only the data-sets and then re-run the automation that creates these objects. With Terraform these could be potentially very quick since Terraform would create the plan file and then only make the changes needed.
For ACI these can prove very valuable because they could potentially be used to add any object to the fabric. For example, you could have a tenant structure that is used by all departments. When adding workloads into the fabric that could be created by just adding a value to a list and Terraform would know to go over all the proper elements to create this pre-defined structure.
You will learn these constructs with the ACI bridge domain for this tenant.
Step 6 - Create the variable file
You will create a variable.tf file in this folder where we will be adding the data structures
that will be used by the iteration code.
In this file we will add the following:
variable "bridge_domains" {
  type = map
  default = {
    aci_p30_bd_app = {
      name             = "aci_p30_bd_app"
      description      = "Application Core bridge"
      arp_flood        = "no"
      ip_learning      = "yes"
      unicast_route    = "yes"
      subnet           = "1.1.20.1/24"
      subnet_scope     = ["private"]
    },
    aci_p30_bd_web = {
      name             = "aci_p30_bd_web"
      description      = "Web/Apache Front End bridge"
      arp_flood        = "yes"
      ip_learning      = "yes"
      unicast_route    = "yes"
      subnet           = "1.1.30.1/24"
      subnet_scope     = ["private"]
    },
  }
}
Object variables
Terraform has the capability of creating objects similar to programing languages. There are various types
that can be used and these have evolved in Terraform world as new features are added. In latest releases
new mechanics have been added including the for_each functionality that in release 13.0 expands
into modules.
Terraform has two categories of complex type variables.
Collection Types
A collection type allows multiple values of one other type to be grouped together as a single value. The type of value within a collection is called its element type.
Structural Types
A structural type allows multiple values of several distinct types to be grouped together as a single value. Structural types require a schema as an argument, to specify which types are allowed for which elements.
| Type | Description | type |
|---|---|---|
| list | a sequence of values identified by consecutive whole numbers starting with zero. | Collection |
| set | a collection of unique values that do not have any secondary identifiers or ordering. | Collection |
| map | a collection of values where each is identified by a string label. | Collection |
| object | a collection of named attributes that each have their own type. | Structural |
| tuple | a sequence of elements identified by consecutive whole numbers starting with zero, where each element has its own type. | structural |
For this exercise, we are going to use the map type for the structure of the data which will contain the
object structure data require to create the bridge domains.
Iterations
Now you can understand how to go through these objects to create them. The map has an index value for each
object inside. We are going to use that for two reasons. First to reference terraform resources and second to get
the value we need from it to create the objects.
For this version of Terraform we can use the for_each operation. If you have programing background it is a
little confusing because it doesn't have a encapsulation like your typical programing language ( say curly backets or
indentation ). Instead this applies to the complete resource.
The other important aspect is that based on the type of structured data used in the for_each the data object
of the resource will then match the type of the defined. Therefore, in this case when the resource is run and creates
all the structures for these bridge domains, the result will be a structured object of type map.
The following diagram will help you understand the relationship.
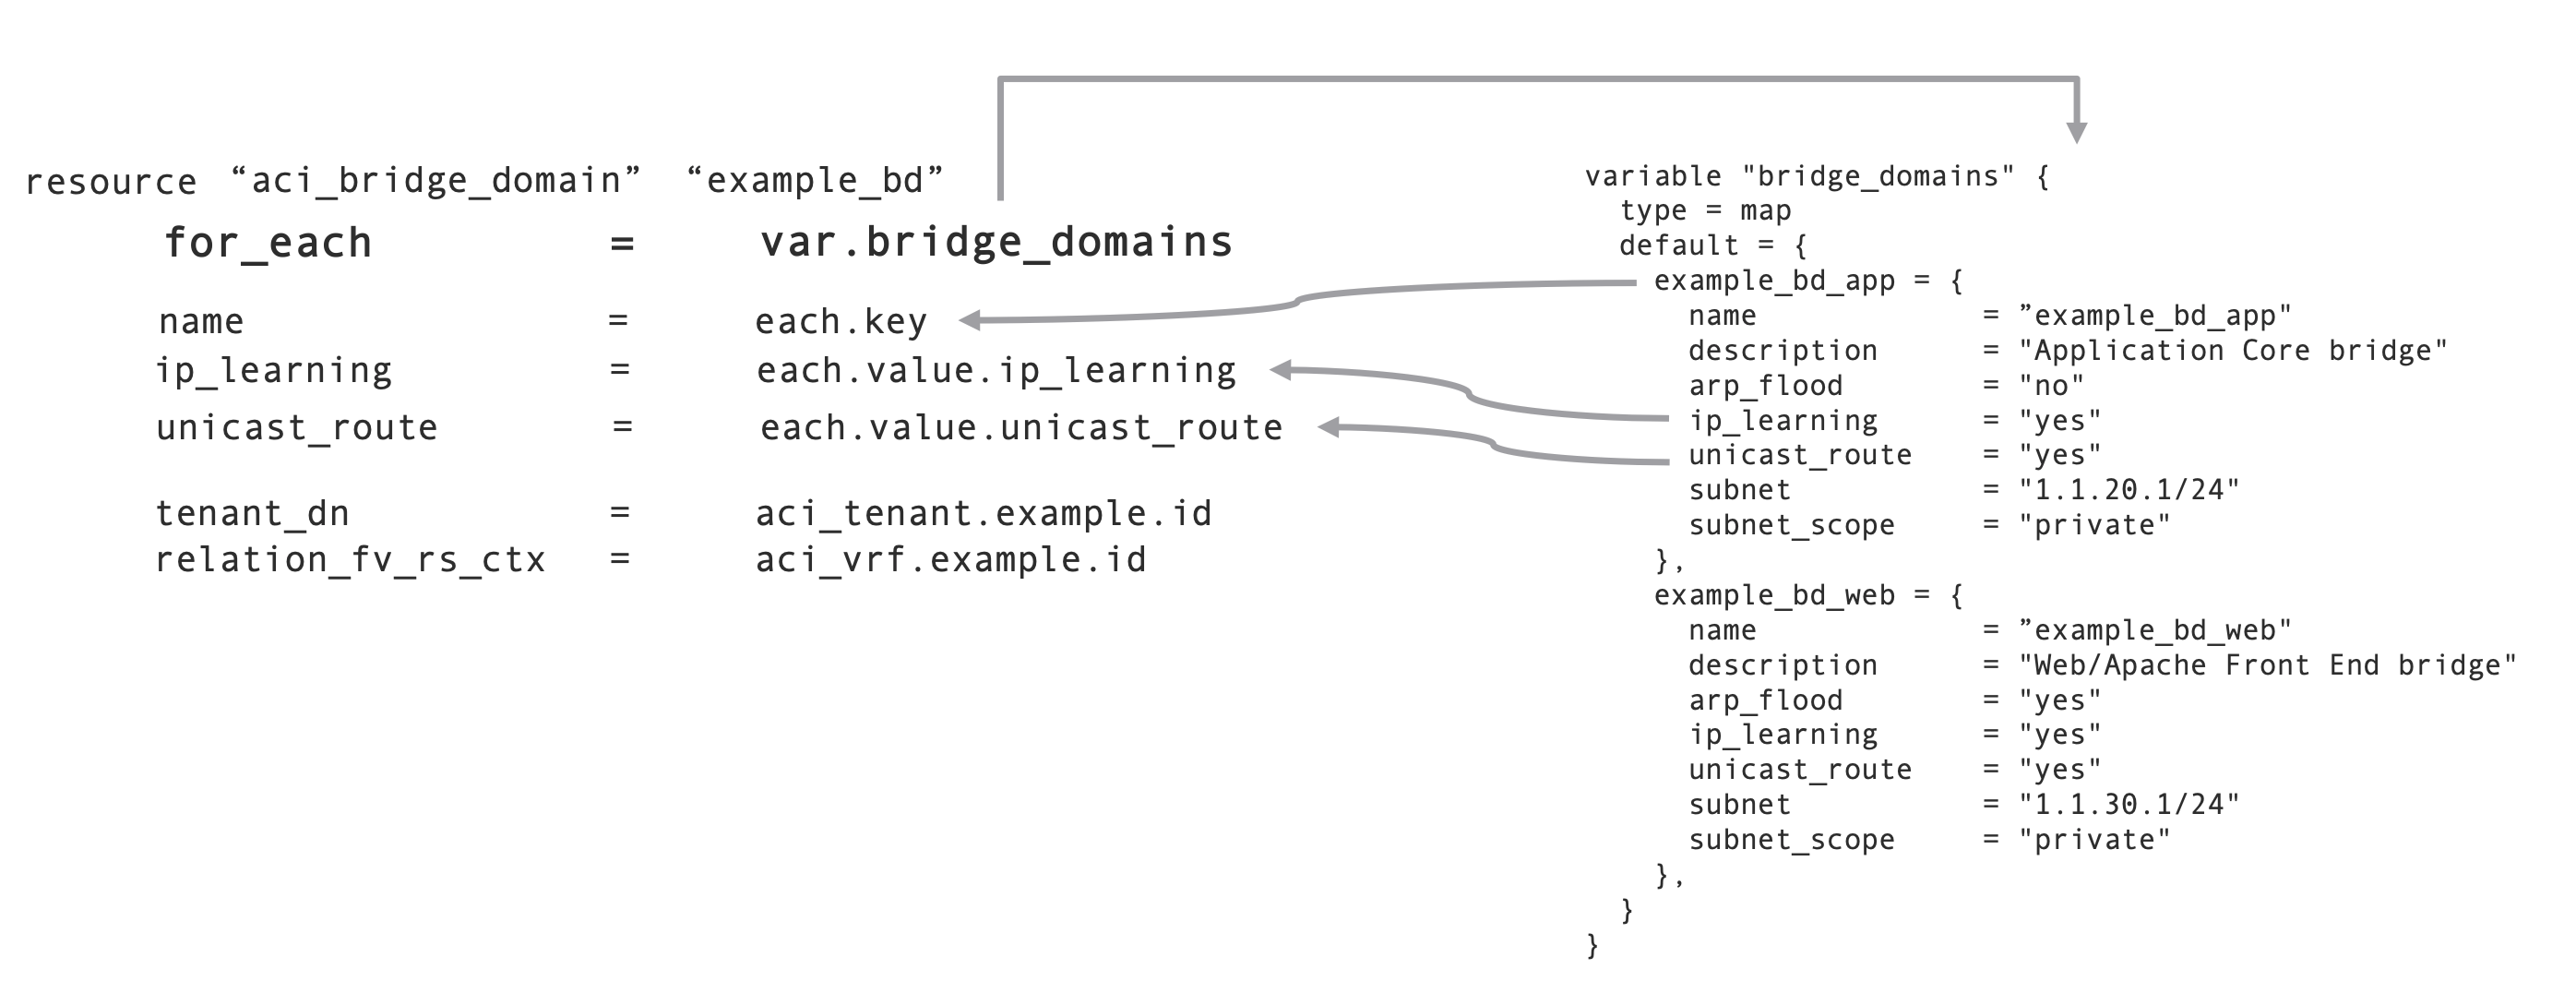
Step 7 - Create the Bridge Domains and subnets
Using the knowledge on iterations, let's build two Bridge Domains (aci_p30_bd_app and
aci_p30_bd_web). In ACI the Bridge Domain or BD is a logical construct where a set of
logical ports share the same flooding and/or broadcast domain. But the most important concept about BD,
is where the user defines the Anycast Gateway.
resource "aci_bridge_domain" "aci_p30_bridges" {
    for_each = var.bridge_domains
    tenant_dn             = aci_tenant.aci_p30_tenant.id
    relation_fv_rs_ctx    = aci_vrf.aci_p30_vrf.id
    name                  = each.value.name
    arp_flood             = each.value.arp_flood
    ip_learning           = each.value.ip_learning
    unicast_route         = each.value.unicast_route
}

resource "aci_subnet" "aci_p30_subnets" {
    for_each             = var.bridge_domains
    parent_dn            = aci_bridge_domain.aci_p30_bridges[each.key].id
    ip                   = each.value.subnet
    scope                = each.value.subnet_scope
}
Step 8 - Run Terraform
For your benefit, you will run these changes again. If you want you can check the Tenant in the ACI fabric to see the created policies.
terraform plan -out tenant.plan
terraform apply "tenant.plan"
Step 9 - Add the Application Profile
Application Profile or AP is where the user defined the policies, services and the relantionship between the EPG.
resource "aci_application_profile" "aci_p30_ap" {
  tenant_dn 		= aci_tenant.aci_p30_tenant.id
  name      		= "aci_p30_ap"
}
Step 10 - Create the Contracts
Contracts in ACI, are a construct where the administrator defines what and how ACI End Point Groups (EPG)
can communicate with each other. Filters are part of the Contracts which containt the L3/L4 definition that
are used to allow inbound/outbound traffic between EPGs. In this particular example, we will be
showcasing how to create an ICMP filter
resource "aci_contract" "aci_p30_con" {
  tenant_dn 		        = aci_tenant.aci_p30_tenant.id
  name			            = "aci_p30_con"
 }

 resource "aci_contract_subject" "aci_p30_sub" {
   contract_dn                  = aci_contract.aci_p30_con.id
   name                         = "aci_p30_sub"
   relation_vz_rs_subj_filt_att = [aci_filter.allow_icmp.id]
 }

 resource "aci_filter" "allow_icmp" {
   tenant_dn = aci_tenant.aci_p30_tenant.id
   name      = "allow_icmp"
 }

 resource "aci_filter_entry" "icmp" {
   name        = "icmp"
   filter_dn   = aci_filter.allow_icmp.id
   ether_t     = "ip"
   prot        = "icmp"
   stateful    = "yes"
 }
Step 11 - Read the VMM domain
In the previous chapter we showed you how to use the terraform aci_rest module to push policies
for which Terraform> doesn't have a module created. In that step you created the VMM domain
for your POD30. In this step we will be using the data construct to
read the value from the fabric to be able to reference the VMM domain to the EPG's as are
needed for definition.
data "aci_vmm_domain" "aci_p30_dc3_vds" {
  provider_profile_dn 	= "/uni/vmmp-VMware"
  name 			        = "aci_p30_dc3_vds"
}
Step 12 - Add End Point Group (EPG) variables
You will need to go back to the Variable File and add a new map object for the EPG.
variable "bridge_domains" {
  type = map
  default = {
    aci_p30_bd_app = {
      name             = "aci_p30_bd_app"
      description      = "Application Core bridge"
      arp_flood        = "no"
      ip_learning      = "yes"
      unicast_route    = "yes"
      subnet           = "1.1.20.1/24"
      subnet_scope     = ["private"]
    },
    aci_p30_bd_web = {
      name             = "aci_p30_bd_web"
      description      = "Web/Apache Front End bridge"
      arp_flood        = "yes"
      ip_learning      = "yes"
      unicast_route    = "yes"
      subnet           = "1.1.30.1/24"
      subnet_scope     = ["private"]
    },
  }
}

variable "end_point_groups" {
  type = map
  default = {
      aci_p30_epg_web = {
          name = "aci_p30_epg_web",
          bd   = "aci_p30_bd_web"

      },
      aci_p30_epg_app = {
          name = "aci_p30_epg_app",
          bd   = "aci_p30_bd_app"
      }
  }
}
Step 13 - Create the End Point Groups
End Point Groups or EPGs, is a logical entity in ACI where learned network elements are grouped together based on having the same characteristics . In a Network Centric pproach, you can view EPG's as the basis of VLANS. The combination of a bridge domain and a EPG could be viewed as a VLAN.
In the Application Centric approach then network components are grouped based on function. You can place databases in an EPG and create policies that control access to specific ports. The same can be said for WEB front end processes that should only receive traffic from PORT 80 and 443.
During this step we will be creating two EPGs to simulate an application centric method, but you can imagine them as separate VLANS thinking traditional ethernet. These EPG's are going to be:
- aci_p30_epg_web
- aci_p30_epg_ap
resource "aci_application_epg" "aci_p30_end_point_groups" {
  for_each = var.end_point_groups

  application_profile_dn  = aci_application_profile.aci_p30_ap.id
  name                    = each.value.name
  relation_fv_rs_bd       = aci_bridge_domain.aci_p30_bridges[each.value.bd].id
  relation_fv_rs_cons     = [aci_contract.aci_p30_con.id]
  relation_fv_rs_prov     = [aci_contract.aci_p30_con.id]
}
Step 14 - Associating EPG to vDS
  resource "aci_epg_to_domain" "aci_p30_epg_to_domain" {
    for_each = var.end_point_groups

    application_epg_dn = aci_application_epg.aci_p30_end_point_groups[each.key].id
    tdn = data.aci_vmm_domain.aci_p30_dc3_vds.id
    }
Step 15 - Apply Terraform
Now execute terraform.
  terraform plan -out tenant.plan
  terraform apply "tenant.plan"
  The output will look like this


aci_tenant.aci_p30_tenant: Creating...
aci_tenant.aci_p30_tenant: Creation complete after 2s [id=uni/tn-aci_p30_tenant]
aci_filter.allow_icmp: Creating...
aci_application_profile.aci_p30_ap: Creating...
aci_vrf.aci_p30_vrf: Creating...
aci_contract.aci_p30_con: Creating...
aci_application_profile.aci_p30_ap: Creation complete after 0s [id=uni/tn-aci_p30_tenant/ap-aci_p30_ap]
aci_contract.aci_p30_con: Creation complete after 1s [id=uni/tn-aci_p30_tenant/brc-aci_p30_con]
aci_filter.allow_icmp: Creation complete after 1s [id=uni/tn-aci_p30_tenant/flt-allow_icmp]
aci_contract_subject.aci_p30_sub: Creating...
aci_filter_entry.icmp: Creating...
aci_filter_entry.icmp: Creation complete after 1s [id=uni/tn-aci_p30_tenant/flt-allow_icmp/e-icmp]
aci_contract_subject.aci_p30_sub: Creation complete after 1s [id=uni/tn-aci_p30_tenant/brc-aci_p30_con/subj-aci_p30_sub]
aci_vrf.aci_p30_vrf: Creation complete after 2s [id=uni/tn-aci_p30_tenant/ctx-aci_30_vrf]
aci_bridge_domain.aci_p30_bd_web: Creating...
aci_bridge_domain.aci_p30_bd_app: Creating...
aci_bridge_domain.aci_p30_bd_app: Creation complete after 2s [id=uni/tn-aci_p30_tenant/BD-aci_p30_bd_app]
aci_bridge_domain.aci_p30_bd_web: Creation complete after 2s [id=uni/tn-aci_p30_tenant/BD-aci_p30_bd_web]
aci_subnet.app_subnet: Creating...
aci_subnet.web_subnet: Creating...
aci_application_epg.aci_p30_epg_app: Creating...
aci_application_epg.aci_p30_epg_web: Creating...
aci_subnet.app_subnet: Creation complete after 2s [id=uni/tn-aci_p30_tenant/BD-aci_p30_bd_app/subnet-[1.1.30.1/24]]
aci_subnet.web_subnet: Creation complete after 2s [id=uni/tn-aci_p30_tenant/BD-aci_p30_bd_web/subnet-[1.1.20.1/24]]
aci_application_epg.aci_p30_epg_web: Creation complete after 3s [id=uni/tn-aci_30_tenant/ap-aci_p30_ap/epg-aci_p30_epg_web]
aci_application_epg.aci_p30_epg_app: Creation complete after 3s [id=uni/tn-aci_30_tenant/ap-aci_p30_ap/epg-aci_p30_epg_app]

Apply complete! Resources: 13 added, 0 changed, 0 destroyed.

The state of your infrastructure has been saved to the path
below. This state is required to modify and destroy your
infrastructure, so keep it safe. To inspect the complete state
use the `terraform show` command.

State path: terraform.tfstate


data.aci_lldp_interface_policy.aci_lab_lldp: Refreshing state...
data.aci_cdp_interface_policy.aci_lab_cdp: Refreshing state...
data.aci_l2_interface_policy.aci_lab_l2global: Refreshing state...
data.aci_miscabling_protocol_interface_policy.aci_lab_mcp: Refreshing state...
data.aci_lacp_policy.aci_lab_lacp: Refreshing state...

An execution plan has been generated and is shown below.
Resource actions are indicated with the following symbols:
  + create

Terraform will perform the following actions:

Apply complete! Resources: 13 added, 0 changed, 0 destroyed.