The purpose of this session is to build an on-premise ACI fabric. During these next sections, the user will take advantage of the different Terraform ACI Resources to be build the ACI fabric. It is important to note that for students that are not familiar with ACI, we have created another lab https://aci-lab.ciscolive.com that will help students understand the value and concepts of ACI.
Step 1 - Create the directory
As we discussed Terraform uses directory structures as a way to organize it's automation
structure. This is due to the fact that Terraform treats everything in a directory as a unit and reads all
the .tf files before execution.
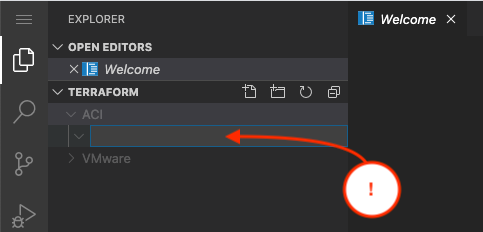
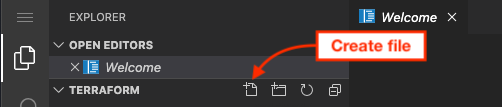
The first step is to create a directory for the Access Policies terraform files you will create. Using the IDE you can create folders. This directory will live under the ACI folder.
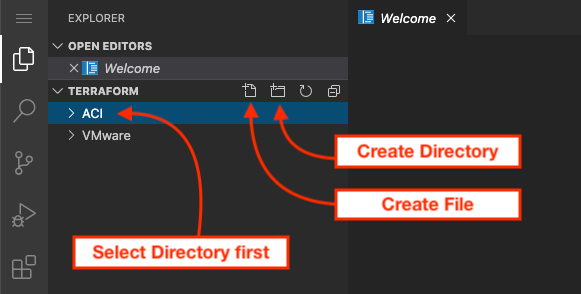
When you click on the directory create ICON then you will be prompted to enter the name of the directory. For this
directory it will be called accpol
Now in that directory you can create the terraform file. In this case it will be called access_policies.tf
Step 2 - Add the ACI provider
The first step in your ACI/Terraform path is to setup the provider definition. For this portion of the lab we are going to utilize the username/password construct but it is not recomended to use this mechanism in production. The best path is to create an account on the fabric and associate certificate credentials such that the interactions from that point are CERT based to the fabric to avoid the fabric doing a denial of service based on excessive password based authentications.
provider "aci" {
    username = "admin"
    password = "cisco.123"
    url      = "http://10.0.226.41"
    insecure = true
}
Documentation
We would like to provide some insights into the Terraform documentation because it was confusing for
us when we started using it. In the documentation you will see two separate distinct components. The
resource and the data.
Resources are going to create structures in the ACI fabric while data is going to read those values. Because of the way Terraform works, you want to use data to read the objects from the fabric that have been created but you don't want Terraform to modify ( think RO model ). For example, you could have a Virtual Machine domain that you've created by hand and just want to associate to it from your config, you would use the data structure and link your newly created object in the ACI fabric.
The following link
https://www.terraform.io/docs/providers/aci/index.html is the
link to the ACI module documentation in Terraform. The layout of the documentation can cause confusion. On the left
side of the documentation is an index with all the modules. What you need to be careful about is
that for every module you will have a resource and a data.
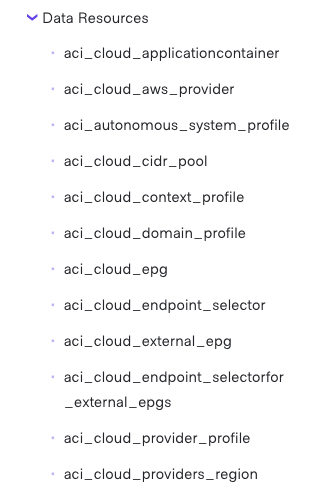
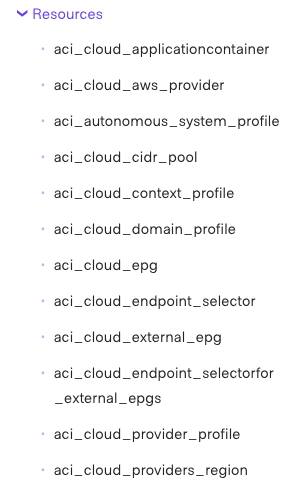
As you can see each module on the page is twice. Once under data and once under resources. When you are searching for
modules pay attention to make sure you are looking at the resource or data elements.
Step 3 - Add the VLAN pools
The first step in setting up access policies for the fabric is the definition of the VLAN Pools. In terraform you will use the resource construct to build the data structures for these policies.
provider "aci" {
    username = "admin"
    password = "cisco.123"
    url      = "http://10.0.226.41"
    insecure = true
}

resource "aci_vlan_pool" "aci_p03_static_vlanpool" {
    name            =       "aci_p03_static_vlanpool"
    description     =       "aci_p03_static_vlanpool"
    alloc_mode      =       "static"
}

resource "aci_vlan_pool" "aci_p03_dynamic_vlanpool" {
    name            =       "aci_p03_dynamic_vlanpool"
    description     =       "aci_p03_dynamic_vlanpool"
    alloc_mode      =       "dynamic"
}
Now you will have to create the VLAN Pool ranges. This introduces the concepts of relationships inside Terraform that are also tied in the ACI fabric. In this case the VLAN ranges for the ACI VLAN pools are children to the VLAN pools themselves. So we have to link the two resources together.
In terraform the resource is called aci_vlan_pool. Terraform then, uses the
next notation to provide the name. In this case you will be using aci_p03_static_vlanpool
and aci_p03_dynamic_vlanpool. These vlan pools were created in the previos step.
But now you will be referencing from the ranges that we want to link.
provider "aci" {
    username = "admin"
    password = "cisco.123"
    url      = "http://10.0.226.41"
    insecure = true
}

resource "aci_vlan_pool" "aci_p03_static_vlanpool" {
    name            =       "aci_p03_static_vlanpool"
    description     =       "aci_p03_static_vlanpool"
    alloc_mode      =       "static"
}

resource "aci_vlan_pool" "aci_p03_dynamic_vlanpool" {
    name            =       "aci_p03_dynamic_vlanpool"
    description     =       "aci_p03_dynamic_vlanpool"
    alloc_mode      =       "dynamic"
}

resource "aci_ranges" "vlan_pool_static" {
    vlan_pool_dn    =       aci_vlan_pool.aci_p03_static_vlanpool.id
    from            =       local.static_vlan_start
    to              =       local.static_vlan_end
    alloc_mode      =       "inherit"
    role            =       "external"
}

resource "aci_ranges" "vlan_pool_dynamic" {
    vlan_pool_dn    =       aci_vlan_pool.aci_p03_dynamic_vlanpool.id
    from            =       local.dynamic_vlan_start
    to              =       local.dynamic_vlan_end
    alloc_mode      =       "inherit"
    role            =       "external"
}
Understanding relationships
Understanding how resources are linked to each other is important in Terraform. If you look at the following diagram.
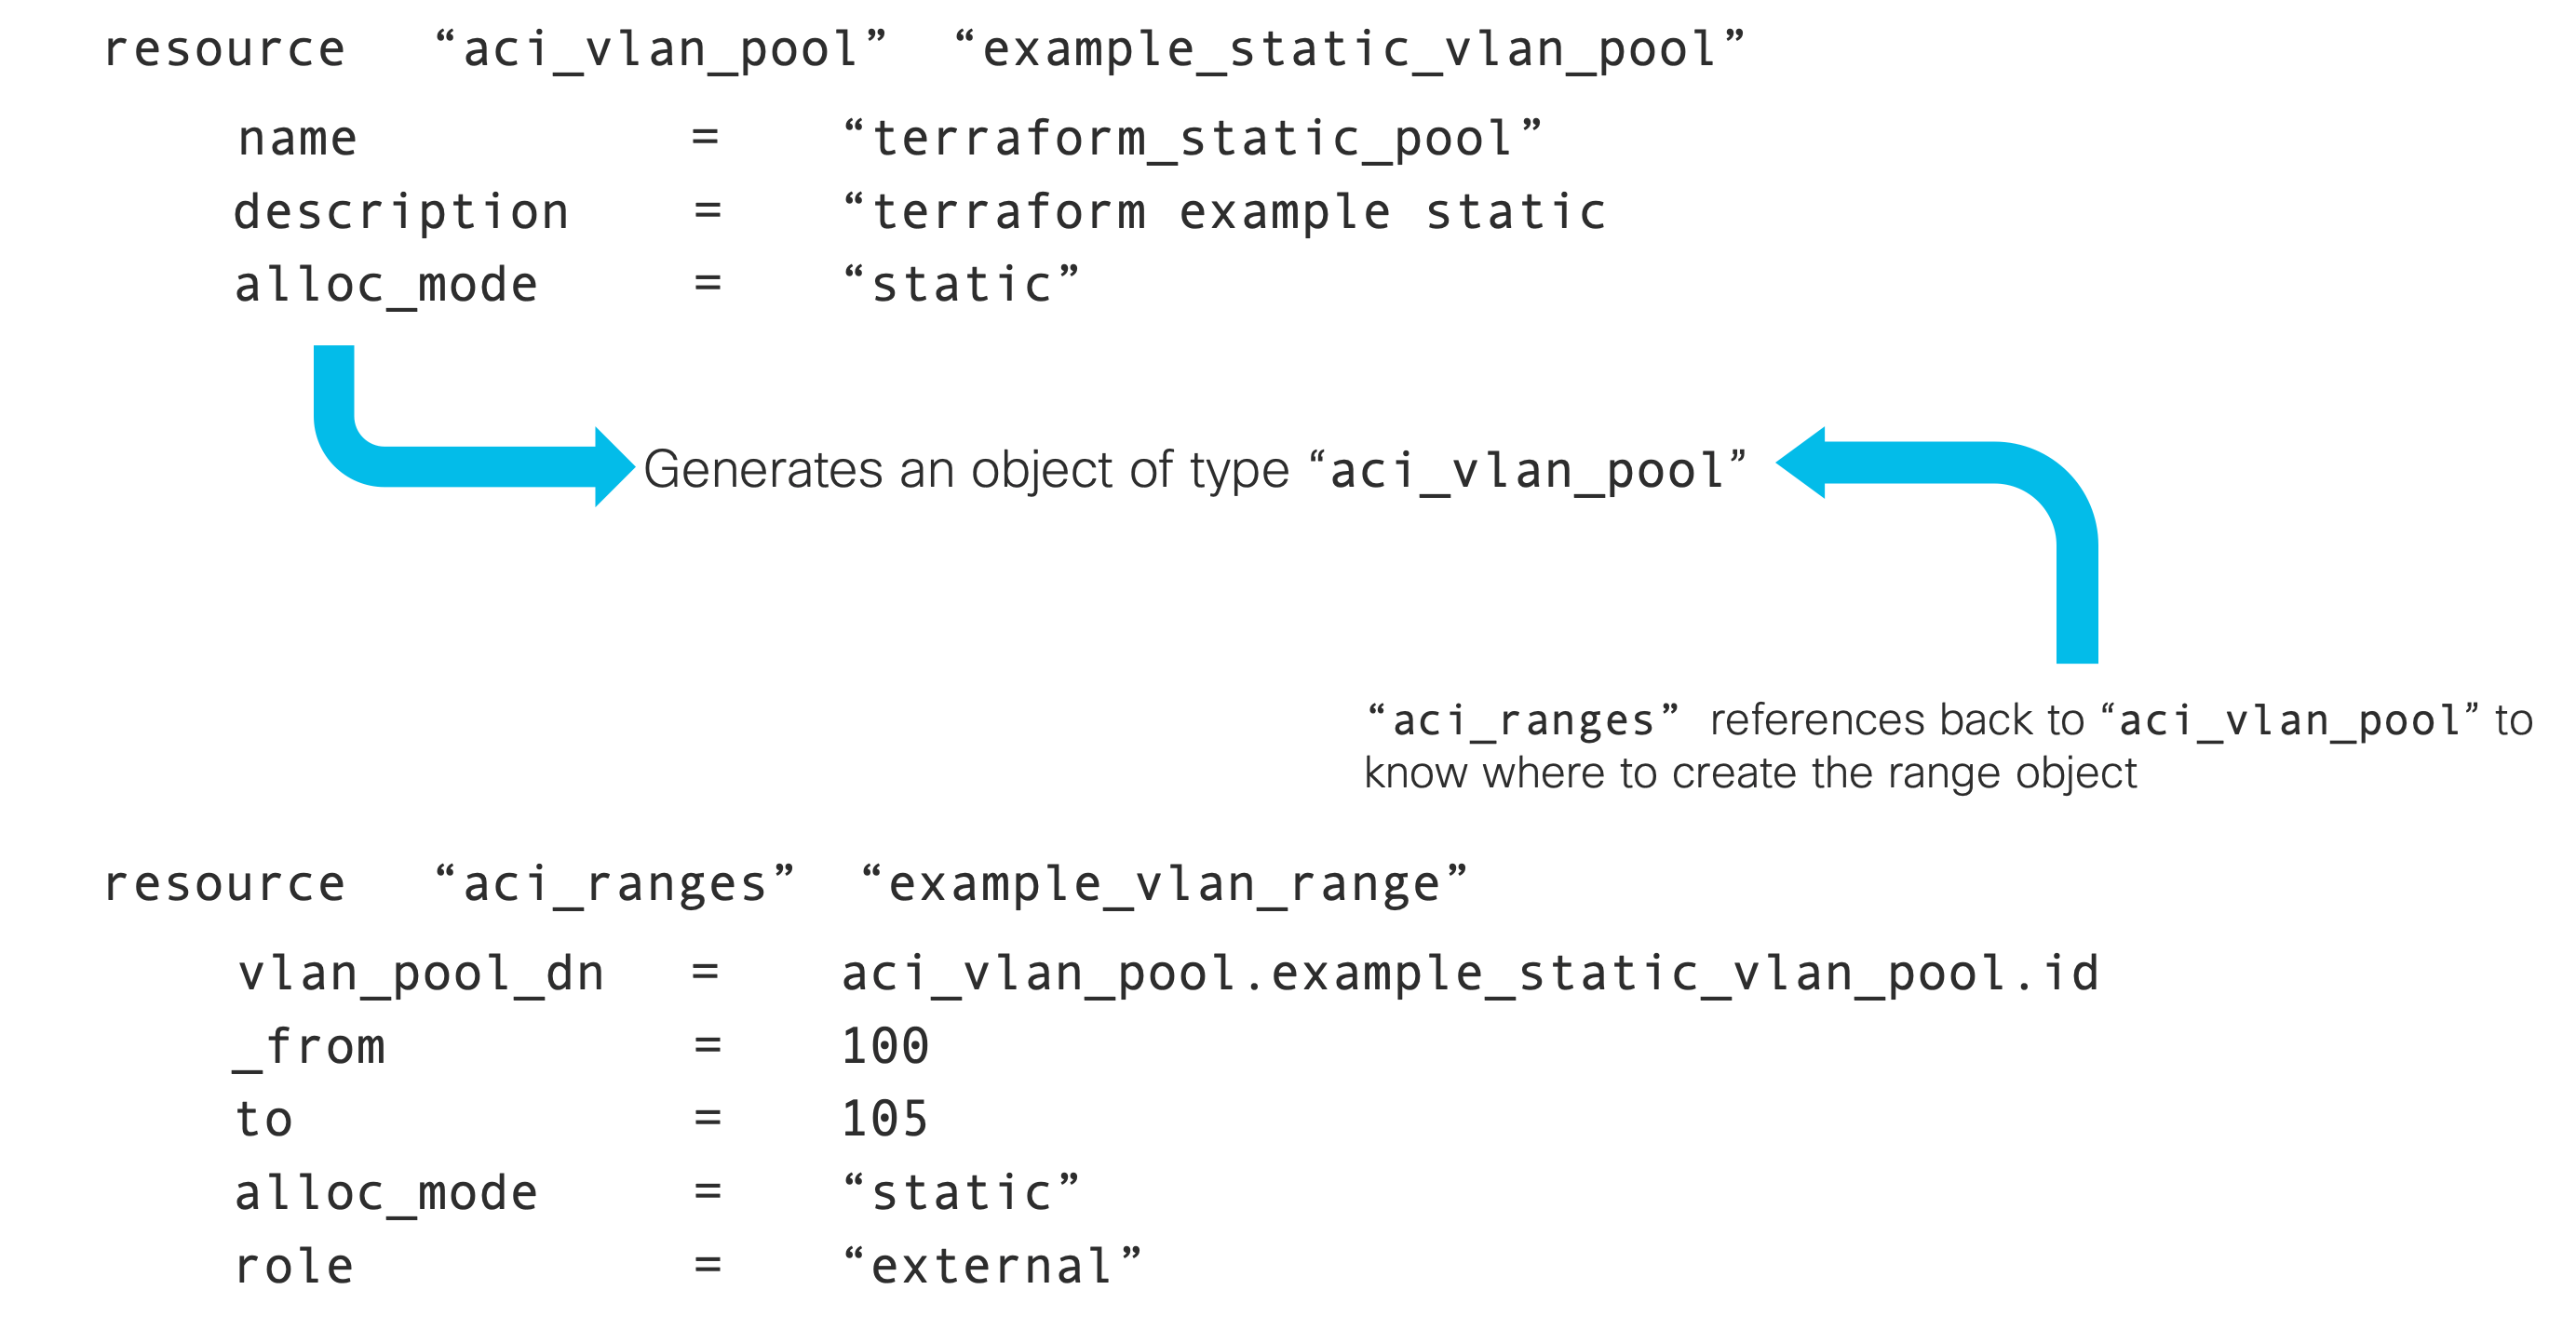
As you may know from ACI the VLAN ranges are a child of the ACI VLAN Pool object. Following this
terraform is doing a form of parent/child relationship through it's own object structure. When the
resource object is executed, terraform ends up with an object internally that contains the data
used by the terraform module. In this example aci_ranges has a link back to
the definition of the vlan_pool that is connected by the module aci_vlan_pool
that was created.
As you will see in the next sections, this relationship is critical to connecting the different ACI objects just as we would normally do programatically.
Step 4 - Variable file
One thing that we also want to show you is how to use the variable construct in Terraform. In the resources that
you construted above there are variables defined using the local variable object. This is one method
to get such value. The other method is to create variable objects via the data resource. We will explain
this shortly.
In the same directory create a file named variables.tf
In this variable file you are going to create a object called locals that will look as follows:
locals {
    static_vlan_start       = "vlan-300"
    static_vlan_end         = "vlan-349"
    dynamic_vlan_start      = "vlan-350"
    dynamic_vlan_end        = "vlan-399"
    access_port             = "03"
    access_leaf             = "203"
    PC_port_1               = "5"
    PC_port_2               = "6"
    PC_leaf                 = "206"
    vpc_port_1              = "03"
    vpc_port_2              = "03"
    vpc_leaf_1              = "207"
    vpc_leaf_2              = "208"
  }
Then save the file.
Step 5 - Run terraform
One of the best things about Terraform is the concept of state keeping and we want to show you how this works with access policies. So the first thing we have to accomplish now is to initialize the directory to include the proper terraform provider modules needed for execution.
In the terminal window make sure you are in the correct directory and then execute terraform init
cd ~/terraform/ACI/accpol
terraform init
You will see that terraform will download the provider for ACI as that is what is defined in this directory.
Initializing the backend...

Initializing provider plugins...
- Checking for available provider plugins...
- Downloading plugin for provider "aci" (terraform-providers/aci)
[cut]
This will tell you the version of the provider code also. With that complete you should be able to now check
what terraform will do using the terraform plan command.
terraform plan -out access_policies.plan
The output will look similar to the following.
Refreshing Terraform state in-memory prior to plan...
The refreshed state will be used to calculate this plan, but will not be
persisted to local or remote state storage.


------------------------------------------------------------------------

An execution plan has been generated and is shown below.
Resource actions are indicated with the following symbols:
  + create

Terraform will perform the following actions:

  # aci_ranges.vlan_pool_dynamic will be created
  + resource "aci_ranges" "vlan_pool_dynamic" {
      + from        = "vlan-350"
      + alloc_mode   = "inherit"
      + annotation   = (known after apply)
      + description  = (known after apply)
      + from         = (known after apply)
      + id           = (known after apply)
      + name_alias   = (known after apply)
      + role         = "external"
      + to           = "vlan-399"
      + vlan_pool_dn = (known after apply)
    }

  # aci_ranges.vlan_pool_static will be created
  + resource "aci_ranges" "vlan_pool_static" {
      + from        = "vlan-300"
      + alloc_mode   = "inherit"
      + annotation   = (known after apply)
      + description  = (known after apply)
      + from         = (known after apply)
      + id           = (known after apply)
      + name_alias   = (known after apply)
      + role         = "external"
      + to           = "vlan-349"
      + vlan_pool_dn = (known after apply)
    }

  # aci_vlan_pool.aci_p03_dynamic_vlanpool will be created
  + resource "aci_vlan_pool" "aci_p03_dynamic_vlanpool" {
      + alloc_mode  = "dynamic"
      + annotation  = (known after apply)
      + description = "aci_p03_dynamic_vlanpool"
      + id          = (known after apply)
      + name        = "aci_p03_dynamic_vlanpool"
      + name_alias  = (known after apply)
    }

  # aci_vlan_pool.aci_p03_static_vlanpool will be created
  + resource "aci_vlan_pool" "aci_p03_static_vlanpool" {
      + alloc_mode  = "static"
      + annotation  = (known after apply)
      + description = "aci_p03_static_vlanpool"
      + id          = (known after apply)
      + name        = "aci_p03_static_vlanpool"
      + name_alias  = (known after apply)
    }

Plan: 4 to add, 0 to change, 0 to destroy.

------------------------------------------------------------------------

This plan was saved to: access_policies.plan

To perform exactly these actions, run the following command to apply:
    terraform apply "access_policies.plan"
The PLAN output listed above is interesting to read. You can see the plus sign besides the elements
that are going to be added to the fabric. Terraform read the fabric and looked at these.
Now you can perform the apply command against the plan file that will tell terraform to go into the fabric and perform these actions.
terraform apply "access_policies.plan"
For wich the output would be:
aci_vlan_pool.aci_p25_static_vlanpool: Creating...
aci_vlan_pool.aci_p25_dynamic_vlanpool: Creating...
aci_vlan_pool.aci_p25_static_vlanpool: Creation complete after 0s [id=uni/infra/vlanns-[aci_p03_static_vlanpool]-static]
aci_vlan_pool.aci_p25_dynamic_vlanpool: Creation complete after 0s [id=uni/infra/vlanns-[aci_p03_dynamic_vlanpool]-dynamic]
aci_ranges.vlan_pool_static: Creating...
aci_ranges.vlan_pool_dynamic: Creating...
aci_ranges.vlan_pool_static: Creation complete after 0s [id=uni/infra/vlanns-[aci_p03_static_vlanpool]-static/from-[vlan-300]-to-[vlan-349]]
aci_ranges.vlan_pool_dynamic: Creation complete after 0s [id=uni/infra/vlanns-[aci_p03_dynamic_vlanpool]-dynamic/from-[vlan-350]-to-[vlan-399]]

Apply complete! Resources: 4 added, 0 changed, 0 destroyed.

The state of your infrastructure has been saved to the path
below. This state is required to modify and destroy your
infrastructure, so keep it safe. To inspect the complete state
use the `terraform show` command.

State path: terraform.tfstate
If you were to run the plan command again, you would see the output is different because now it will only show the changes that it plans to do over the previous push. You will be making changes to the terraform file and running to see how it knows where to make the changes and where to simply skip because it knows that everything is in the state it is supposed to be.
Step 6 - ACI Domains
resource "aci_physical_domain" "aci_p03_physdom" {
    name            =       "aci_p03_physdom"
    relation_infra_rs_vlan_ns = aci_vlan_pool.aci_p03_static_vlanpool.id
}

resource "aci_l3_domain_profile" "aci_p03_extrtdom" {
    name            =       "aci_p03_extrtdom"
}
Step 7 - Attacheable Entity Profiles
resource "aci_attachable_access_entity_profile" "aci_p03_l2_aep" {
    name            =       "aci_p03_l2_aep"
    relation_infra_rs_dom_p =       [aci_physical_domain.aci_p03_physdom.id]
}

resource "aci_attachable_access_entity_profile" "aci_p03_l3_aep" {
    name            =       "aci_p03_l3_aep"
    relation_infra_rs_dom_p =       [aci_l3_domain_profile.aci_p03_extrtdom.id]
}

resource "aci_attachable_access_entity_profile" "aci_p03_vmm_aep" {
    name            =       "aci_p03_vmm_aep"
}
Step 8 - Interface Policy Groups
The interface policy group is going to show you how to utilize the data construct. The data construct is
different than the resource because it is designed to read data from the infrastructure. In this
case we have already created the necessary objects in the fabric that defined the interface behaviours for the interface policy group.
Since these objects are already created by terraform and used by many components of the fabric, we don't want to use the resource construct because if we tell terraform to roll back the config, it would remove those objects and we would not want that to happen. We just want to refer to them.
These ACI objects that we are going to link into the interface policy group are:
- L2 Interface policy
- LLDP Policy
- CDP Policy
- MCP Policy ( miscabling policy )
- LACP Policy
Each value is then referenced via the data construct referencing the name as it is defined
in the fabric itself.
data "aci_l2_interface_policy" "aci_lab_l2global" {
    name = "aci_lab_l2global"
}

data "aci_lldp_interface_policy" "aci_lab_lldp" {
    name = "aci_lab_lldp"
}

data "aci_cdp_interface_policy" "aci_lab_cdp" {
    name = "aci_lab_cdp"
}

data "aci_miscabling_protocol_interface_policy" "aci_lab_mcp" {
    name = "aci_lab_mcp"
}

data "aci_lacp_policy" "aci_lab_lacp" {
    name = "aci_lab_lacp"
}
With these completed you can now create the terraform policy groups themselves as:
resource "aci_leaf_access_port_policy_group" "aci_p03_intpolg_access" {
    name                            = "aci_p03_intpolg_access"
    relation_infra_rs_cdp_if_pol    = data.aci_cdp_interface_policy.aci_lab_cdp.id
    relation_infra_rs_lldp_if_pol   = data.aci_lldp_interface_policy.aci_lab_lldp.id
    relation_infra_rs_mcp_if_pol    = data.aci_miscabling_protocol_interface_policy.aci_lab_mcp.id
    relation_infra_rs_l2_if_pol     = data.aci_l2_interface_policy.aci_lab_l2global.id
    relation_infra_rs_att_ent_p     = aci_attachable_access_entity_profile.aci_p03_l3_aep.id
}

resource "aci_leaf_access_bundle_policy_group" "aci_p03_intpolg_pc" {
    name                            = "aci_p03_intpolg_pc"
    relation_infra_rs_cdp_if_pol    = data.aci_cdp_interface_policy.aci_lab_cdp.id
    relation_infra_rs_lldp_if_pol   = data.aci_lldp_interface_policy.aci_lab_lldp.id
    relation_infra_rs_mcp_if_pol    = data.aci_miscabling_protocol_interface_policy.aci_lab_mcp.id
    relation_infra_rs_l2_if_pol     = data.aci_l2_interface_policy.aci_lab_l2global.id
    relation_infra_rs_att_ent_p     = aci_attachable_access_entity_profile.aci_p03_l2_aep.id
    relation_infra_rs_lacp_pol      = data.aci_lacp_policy.aci_lab_lacp.id
}
In the next portion of the HCL file, we are going to be adding the lag_t variable with the value node which sets this policy group to be
a vPC.
resource "aci_leaf_access_bundle_policy_group" "aci_p03_intpolg_vpc" {
    name                            = "aci_p03_intpolg_vpc"
    lag_t                           = "node"
    relation_infra_rs_cdp_if_pol    = data.aci_cdp_interface_policy.aci_lab_cdp.id
    relation_infra_rs_lldp_if_pol   = data.aci_lldp_interface_policy.aci_lab_lldp.id
    relation_infra_rs_mcp_if_pol    = data.aci_miscabling_protocol_interface_policy.aci_lab_mcp.id
    relation_infra_rs_l2_if_pol     = data.aci_l2_interface_policy.aci_lab_l2global.id
    relation_infra_rs_att_ent_p     = aci_attachable_access_entity_profile.aci_p03_vmm_aep.id
    relation_infra_rs_lacp_pol      = data.aci_lacp_policy.aci_lab_lacp.id
}
Step 9 - Push these changes into the fabric
Here we are going to see the coolest part of Terraform. You are going to run the terraform plan command again and you will see how it will show the variations.
terraform plan -out access_policies.plan
As you can see the only thing that it is showing are the changes based on the differences. Now you can apply the changes in the plan.
terraform apply "access_policies.plan"
And you can view the current state with terraform show command that displays everything it is keeping
track of. One important thing to realize is another file that is in the directory now called
terraform.tfstate. This files contains all the different objects and states related to the
plan file and you can view this file in the editor as it is ASCII instead of binary compared to the
plan file.
Step 10 - Finish all access policies
To accelerate forward, the next step is going to be a big drop of code. These resources are going to build the interface policies and the leaf policies in the fabric.
resource "aci_leaf_interface_profile" "aci_p03_acc_intf_p" {
    name                            = "aci_p03_acc_intf_p"
}

resource "aci_access_port_selector" "pod03_acc_port_selector" {
    leaf_interface_profile_dn      = aci_leaf_interface_profile.aci_p03_acc_intf_p.id
    name                           = "pod03_acc_port_selector"
    access_port_selector_type      = "range"
    relation_infra_rs_acc_base_grp = aci_leaf_access_port_policy_group.aci_p03_intpolg_access.id
}

resource "aci_access_port_block" "pod03_acc_port_block" {
    access_port_selector_dn = aci_access_port_selector.pod03_acc_port_selector.id
    name                    = "pod03_acc_port_block"
    from_card               = "1"
    from_port               = local.access_port
    to_card                 = "1"
    to_port                 = local.access_port
}

resource "aci_leaf_profile" "aci_p03_access_sp" {
    name                         = "aci_p03_access_sp"
    relation_infra_rs_acc_port_p = [aci_leaf_interface_profile.aci_p03_acc_intf_p.id]
}

resource "aci_leaf_selector" "aci_p03_access_sp" {
    leaf_profile_dn         = aci_leaf_profile.aci_p03_access_sp.id
    name                    = "aci_p03_access_sp"
    switch_association_type = "range"
}

resource "aci_node_block" "pod03_access_leaf_nodes" {
    switch_association_dn = aci_leaf_selector.aci_p03_access_sp.id
    name                  = "pod03_access_leaf_nodes"
    from_                 = local.access_leaf
    to_                   = local.access_leaf
}

resource "aci_leaf_interface_profile" "aci_p03_pc_intf_p" {
    name                            = "aci_p03_pc_intf_p"
}

resource "aci_access_port_selector" "pod03_pc_port_selector" {
    leaf_interface_profile_dn      = aci_leaf_interface_profile.aci_p03_pc_intf_p.id
    name                           = "pod03_pc_port_selector"
    access_port_selector_type      = "range"
    relation_infra_rs_acc_base_grp = aci_leaf_access_bundle_policy_group.aci_p03_intpolg_pc.id
}

resource "aci_access_port_block" "pod03_pc_port_block" {
    access_port_selector_dn = aci_access_port_selector.pod03_pc_port_selector.id
    name                    = "pod03_pc_port_block"
    from_card               = "1"
    from_port               = local.PC_port_1
    to_card                 = "1"
    to_port                 = local.PC_port_2
}

resource "aci_leaf_profile" "aci_p03_pc_sp" {
    name                         = "aci_p03_pc_sp"
    relation_infra_rs_acc_port_p = [aci_leaf_interface_profile.aci_p03_pc_intf_p.id]
}

resource "aci_leaf_selector" "aci_p03_pc_sp" {
    leaf_profile_dn         = aci_leaf_profile.aci_p03_pc_sp.id
    name                    = "aci_p03_pc_sp"
    switch_association_type = "range"
}

resource "aci_node_block" "pod03_pc_leaf_nodes" {
    switch_association_dn = aci_leaf_selector.aci_p03_pc_sp.id
    name                  = "pod03_pc_leaf_nodes"
    from_                 = local.PC_leaf
    to_                   = local.PC_leaf
}

resource "aci_leaf_interface_profile" "aci_p03_vpc_intf_p" {
    name                            = "aci_p03_vpc_intf_p"
}

resource "aci_access_port_selector" "pod03_vpc_port_selector" {
    leaf_interface_profile_dn      = aci_leaf_interface_profile.aci_p03_vpc_intf_p.id
    name                           = "pod03_vpc_port_selector"
    access_port_selector_type      = "range"
    relation_infra_rs_acc_base_grp = aci_leaf_access_bundle_policy_group.aci_p03_intpolg_vpc.id
}

resource "aci_access_port_block" "pod03_vpc_port_block" {
    access_port_selector_dn = aci_access_port_selector.pod03_vpc_port_selector.id
    name                    = "pod03_vpc_port_block"
    from_card               = "1"
    from_port               = local.vpc_port_1
    to_card                 = "1"
    to_port                 = local.vpc_port_2
}

resource "aci_leaf_profile" "aci_p03_vpc_sp" {
    name                         = "aci_p03_vpc_sp"
    relation_infra_rs_acc_port_p = [aci_leaf_interface_profile.aci_p03_vpc_intf_p.id]
}

resource aci_leaf_selector" "aci_p03_vpc_sp" {
    leaf_profile_dn         = aci_leaf_profile.aci_p03_vpc_sp.id
    name                    = "aci_p03_vpc_sp"
    switch_association_type = "range"
}

resource "aci_node_block" "pod03_vpc_leaf_nodes" {
    switch_association_dn = aci_leaf_selector.aci_p03_vpc_sp.id
    name                  = "pod03_vpc_leaf_nodes"
    from_                 = local.vpc_leaf_1
    to_                   = local.vpc_leaf_2
}
Step 11 - Apply the final configuration for all access policies
Now run the plan and the apply command to complete the construction of all the ACI policies
terraform plan -out access_policies.plan
terraform apply "access_policies.plan"
Step 12 - Let's destroy!
This is an area that is super useful about automation and specially Terraform. That whatever you have created, could also be easily destroyed. But more importantly Terraform keeps track of everything including what it destroys.
terraform destroy
In this output now terraform uses the minus symbol in red to indicate that these policies
are about to be deleted from the fabric.
[CUT]
An execution plan has been generated and is shown below.
Resource actions are indicated with the following symbols:
  - destroy

Terraform will perform the following actions:

  # aci_access_port_block.pod03_acc_port_block will be destroyed
  - resource "aci_access_port_block" "pod03_acc_port_block" {
      - access_port_selector_dn = "uni/infra/accportprof-aci_p03_acc_intf_p/hports-pod03_acc_port_selector-typ-range" -> null
      - from_card               = "1" -> null
      - from_port               = "03" -> null
      - id                      = "uni/infra/accportprof-aci_p03_acc_intf_p/hports-pod03_acc_port_selector-typ-range/portblk-pod03_acc_port_block" -> null
      - name                    = "pod03_acc_port_block" -> null
      - to_card                 = "1" -> null
      - to_port                 = "03" -> null
    }
[CUT]
It will ask you to type yes and it will destroy these. Go ahead, it is easy to add them all
back again!
Step 13 - Let's rebuild!
This kind of silly exercise shows the value of automation in creating these policies with Terraform. And it shows how fast Terraform is when doing these. You have to run the plan again because the destroy changed the plan and terraform now needs to again go through the process to get the right states.
terraform plan -out access_policies.plan
terraform apply "access_policies.plan"