During this step, the user will be creating two Virtual Machines in vCenter. We will be leveraging the VMware vSphere Provider which give us the ability to work with VMware vSphere Products like vCenter Server and ESXi. This provider allow us to configure vSphere environments like VMs, dVs, clusters, etc.
The VMware vSphere Provider is located here.
We will be creating two files to introduce the concept on how to use variables in Terraform:
- Configuration Code
- Variables File
Step 2 - Create the directory
The first step is to create a directory for the Virtual Machines terraform files. Using the IDE you can create folders. This directory will live under the VMware folder.
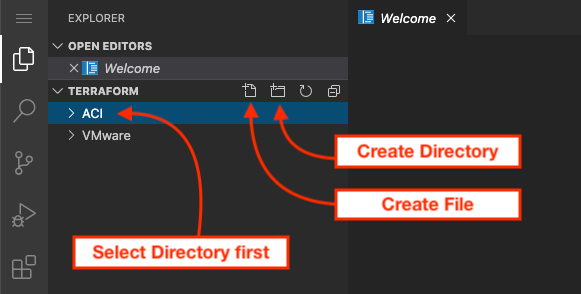
When you click on the directory create ICON then you will be prompted to enter the name of the directory. For this
directory it will be called
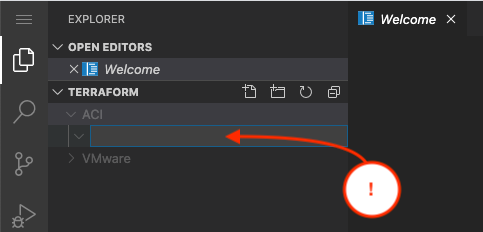
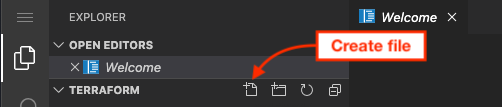
Now in that directory you can create the terraform file. In this case it will be called create_vms.tf
Step 3 - Add the vSphere provider
provider "vsphere" {
  user                 = "Terra20"
  password             = "sanse.2019"
  vsphere_server       = "vcenter6.ecatsrtpdmz.cisco.com"
  allow_unverified_ssl = true
  }
Step 4 - Read vSphere data
During this step, we will be reading the vSphere Data.
data "vsphere_datacenter" "dc" {
  name = local.dc
}

data "vsphere_host" "hosts" {
  name          = local.compute
  datacenter_id = data.vsphere_datacenter.dc.id
}

data "vsphere_compute_cluster" "compute_cluster" {
  name          = local.cluster
  datacenter_id = data.vsphere_datacenter.dc.id
}

data "vsphere_resource_pool" "pool" {
  name          = local.resource_pool_id
  datacenter_id = data.vsphere_datacenter.dc.id
}

data "vsphere_datastore" "datastore" {
  name          = local.datastore
  datacenter_id = data.vsphere_datacenter.dc.id
}

data "vsphere_network" "v322" {
  name          = local.vnic1
  datacenter_id = data.vsphere_datacenter.dc.id
}

data "vsphere_network" "interfaces" {
  for_each = var.vms
  name          = each.value.epg
  datacenter_id = data.vsphere_datacenter.dc.id
 }

data "vsphere_virtual_machine" "template" {
  name          = local.template
  datacenter_id = data.vsphere_datacenter.dc.id
}
Step 5 - Create Virtual Machines
In this step we will be introducing a Terraform Loop with this loop, we will be creating the two virtual machines. The syntax
for this loop is for_each. Please pay close attention to line 50 for the for_each condition.
resource "vsphere_virtual_machine" "vm" {

  for_each = var.vms

  datastore_id     = data.vsphere_datastore.datastore.id
  resource_pool_id = data.vsphere_resource_pool.pool.id
  guest_id         = data.vsphere_virtual_machine.template.guest_id

  network_interface {
    network_id = data.vsphere_network.v322.id
  }

  network_interface {
    network_id = data.vsphere_network.interfaces[each.value.name]["id"]
  }

  name = each.value.name

  num_cpus = local.cpu_count
  memory   = local.memory

  disk {
    label            = local.disk_label
    size             = local.disk_size
    thin_provisioned = local.disk_thin
  }

  clone {
    template_uuid = data.vsphere_virtual_machine.template.id

    customize {
      linux_options {
        host_name = each.value.name
        domain    = local.domain
      }

      network_interface {
        ipv4_address    = each.value.ipv4_add_mgt
        ipv4_netmask    = local.ipv4_net
        dns_server_list = local.dns
      }

      network_interface {
        ipv4_address = each.value.ipv4_add_fab
        ipv4_netmask = 24
      }

      ipv4_gateway = local.ipv4_gate
    }
  }
Step 6 - Adding Static Routes
During this step, we want to introduce another interesting feature in Terraforom which is the ability to execute remote commands to a device. This is done via the provisioner command. It is important to note that Terraform will not model these actions as part of the plan.
For more information please visit https://www.terraform.io/docs/provisioners/index.html
resource "vsphere_virtual_machine" "vm" {

  for_each = var.vms

  datastore_id     = data.vsphere_datastore.datastore.id
  resource_pool_id = data.vsphere_resource_pool.pool.id
  guest_id         = data.vsphere_virtual_machine.template.guest_id

  network_interface {
    network_id = data.vsphere_network.v322.id
  }

  network_interface {
    network_id = data.vsphere_network.interfaces[each.value.name]["id"]
  }

  name = each.value.name

  num_cpus = local.cpu_count
  memory   = local.memory

  disk {
    label            = local.disk_label
    size             = local.disk_size
    thin_provisioned = local.disk_thin
  }

  clone {
    template_uuid = data.vsphere_virtual_machine.template.id

    customize {
      linux_options {
        host_name = each.value.name
        domain    = local.domain
      }

      network_interface {
        ipv4_address    = each.value.ipv4_add_mgt
        ipv4_netmask    = local.ipv4_net
      }

      network_interface {
        ipv4_address = each.value.ipv4_add_fab
        ipv4_netmask = 24
      }

      ipv4_gateway = local.ipv4_gate
      dns_server_list = local.dns
    }
  }
  provisioner "remote-exec" {
    inline = [
      "route add -net 1.0.0.0/8 gw ${each.value.ipv4_nic2_gw}",
    ]
  }
  connection {
    type = "ssh"
    host = each.value.ipv4_add_mgt
    user = "root"
    password = local.password
    port = "22"
    agent = false
    }
}
Step 7 - Variable file
As in the previous section, we need to create the variable file which is going to contain our Virtual Machines definitions.
In the same directory create a file named variables.tf
In this variable file you are going to create a object called locals that will look as follows:
  locals {
    dc                  = "dc_pod20"
    compute             = "pod20-compute1.ecatsrtpdmz.cisco.com"
    cluster             = "pod20_cluster"
    resource_pool_id    = "pod20_resource_pool"
    datastore           = "NFSDSK1"
    vnic1               = "v322"
    template            = "/Cisco Live/dc_pod32/vm/terra-appweb"
    cpu_count           = "2"
    memory              = "8192"
    disk_label          = "disk0"
    disk_size           = "16"
    disk_thin           = "true"
    domain              = "ecastrtpdmz.cisco.com"
    ipv4_net            = "24"
    dns                 = ["10.0.226.251", "8.8.8.8"]
    ipv4_gate           = "10.0.222.1"
    password            = "cisco.123"
  }

variable "vms" {
    type = map
    default = {
      pod20-vm2-app = {
        name         = "pod20-vm2-app"
        ipv4_add_mgt = "10.0.222.68"
        ipv4_add_fab = "1.1.20.2"
        ipv4_nic2_gw = "1.1.20.1"
        epg          = "aci_p20_tenant|aci_p20_ap|aci_p20_epg_app"
      },
      pod20-vm3-web = {
        name         = "pod20-vm3-web"
        ipv4_add_mgt = "10.0.222.69"
        ipv4_add_fab = "1.1.30.2"
        ipv4_nic2_gw = "1.1.30.1"
        epg          = "aci_p20_tenant|aci_p20_ap|aci_p20_epg_web"
      },
    }
  }
Then save the file.
Step 8 - Initialize the Project
Initialize the project, this process will download the necessary plugins which will allow Terraform to interact with vSphere.
  cd ~/terraform/VMware/vms
  terraform init
labuser@terra-vm-pod20:~/terraform/VMware/vms$ terraform init

Initializing the backend...

Initializing provider plugins...
- Checking for available provider plugins...
- Downloading plugin for provider "vsphere" (hashicorp/vsphere) 1.21.1...

The following providers do not have any version constraints in configuration,
so the latest version was installed.

To prevent automatic upgrades to new major versions that may contain breaking
changes, it is recommended to add version = "..." constraints to the
corresponding provider blocks in configuration, with the constraint strings
suggested below.

* provider.vsphere: version = "~> 1.24"

Terraform has been successfully initialized!

You may now begin working with Terraform. Try running "terraform plan" to see
any changes that are required for your infrastructure. All Terraform commands
should now work.

If you ever set or change modules or backend configuration for Terraform,
rerun this command to reinitialize your working directory. If you forget, other
commands will detect it and remind you to do so if necessary.
Step 9 - Apply the final configuration to vCenter
After successfully initialized Terraform, the next step is to execute the terraform plan and terraform apply.

After successfully initialized Terraform, the next step is to execute the terraform plan and terraform apply.
  terraform plan -out create_vms.plan
  terraform apply "create_vms.plan"
labuser@terra-vm-pod20:~/terraform/VMware/vms$  terraform plan -out create_vms.plan
Refreshing Terraform state in-memory prior to plan...
The refreshed state will be used to calculate this plan, but will not be
persisted to local or remote state storage.

data.vsphere_datacenter.dc: Refreshing state...
data.vsphere_network.v322: Refreshing state...
data.vsphere_resource_pool.pool: Refreshing state...
data.vsphere_network.interfaces["pod20-vm3-web"]: Refreshing state...
labuser@terra-vm-pod20:~/terraform/VMware/vms$terraform apply "create_vms.plan"
vsphere_virtual_machine.vm["pod20-vm3-web"]: Creating...
vsphere_virtual_machine.vm["pod20-vm2-app"]: Creating...
vsphere_virtual_machine.vm["pod20-vm3-web"]: Still creating... [10s elapsed]
vsphere_virtual_machine.vm["pod20-vm2-app"]: Still creating... [10s elapsed]
vsphere_virtual_machine.vm["pod20-vm3-web"]: Still creating... [20s elapsed]
vsphere_virtual_machine.vm["pod20-vm2-app"]: Still creating... [20s elapsed]
Step 10 Verify VM connectivy
Once Terraform has completed the process of creating the two Virtual Machines. It is time to verify connectivity between the VMs through the ACI fabric. Click on the below VMs to launch the ssh connection:
- Username: root
- Password: cisco.123
From pod20-vm2-app start a ping to pod20-vm3-web:
ping 1.1.30.2
  [root@pod20-vm2-app ~]#  ping 1.1.30.2
  PING 1.1.30.2 (1.1.30.2) 56(84) bytes of data.
  64 bytes from 1.1.30.2: icmp_seq=1 ttl=63 time=0.187 ms
  64 bytes from 1.1.30.2: icmp_seq=2 ttl=63 time=0.184 ms
  64 bytes from 1.1.30.2: icmp_seq=3 ttl=63 time=0.177 ms
  64 bytes from 1.1.30.2: icmp_seq=4 ttl=63 time=0.173 ms
  64 bytes from 1.1.30.2: icmp_seq=5 ttl=63 time=0.178 ms
If the pings are successfully, this means that both VMs are able to reach eachother through the ACI Fabric.